
You’ve probably unknowingly pressed chips before whenever surfing through the internet, emailing, or using apps. Basically, chips are everywhere, which is why today we will know how to use material chips in flutter. We’ve already covered chips and badges before, but those are external packages. We’re going to cover the material’s chip, which doesn’t require us to install packages, we just have to import them. Which is why in this blog we’re going to discuss how to use material design Chips in Flutter.
About Flutter Badges: https://www.nucleiotechnologies.com/how-to-implement-badges-in-flutter
4 Types of Chips
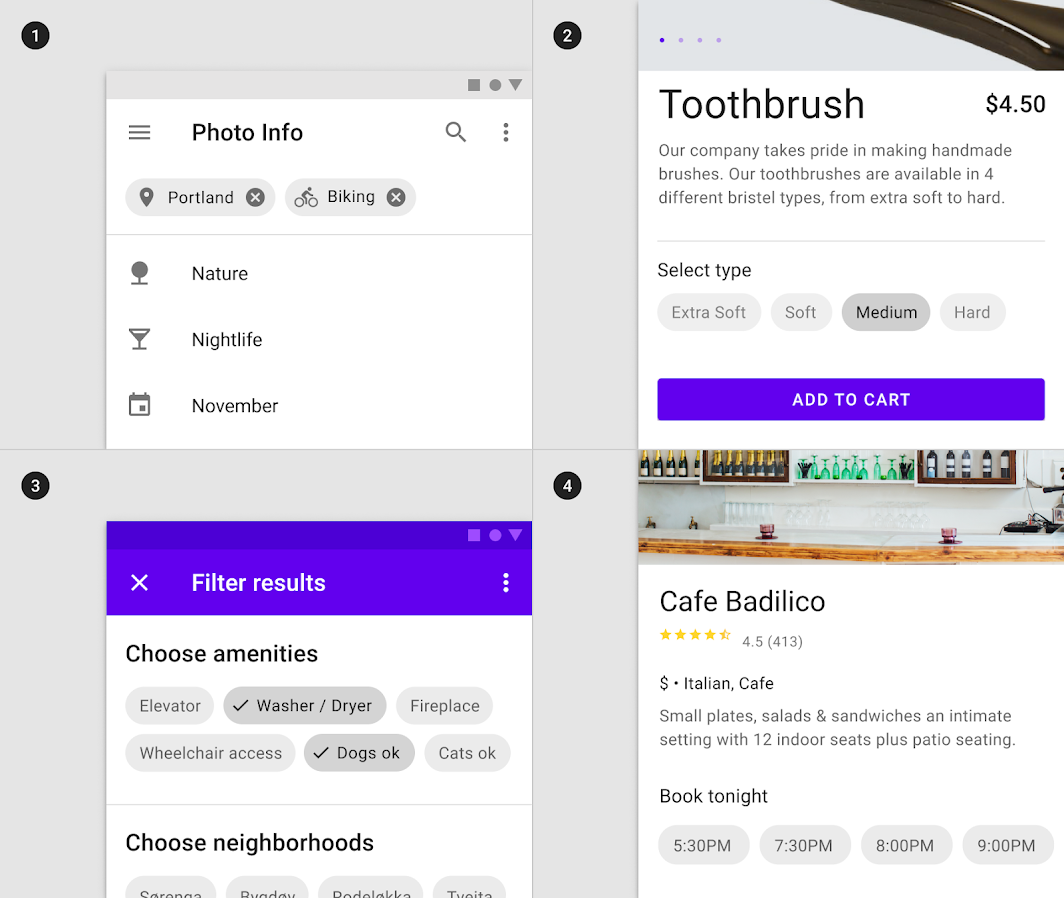
Despite the fact that chips look very similar to badges, they in fact have four types of chips. These are input, choice, filter, and action.
Input Chips
Firstly, input chips compactly represent a complicated item of information, such as an entity (person, place, or thing) or text. They allow for user input and validate it by turning text into chips.
Choice Chips
Next, choice chips enable the selection of a single chip from a list of alternatives. In a small space, choice chips easily distinguish and display options. They are an excellent substitute for toggle buttons, radio buttons, and single-select menus.
Filter Chips
Then, filter chips filter content using tags or descriptive terms. Filter chips clearly distinguish and present possibilities in a small space. They are an excellent substitute for toggle buttons or checkboxes.
Action Chips
Lastly, action chips provide activities that are relevant to the principal content. They should emerge in a UI dynamically and contextually.
Buttons, as an alternative to action chips, should appear repeatedly and consistently.
The Anatomy
After discussing about how to use material design chips in Flutter. On the contrary, the chip anatomy contains firstly its container in which that’s where it holds its components, secondly the thumbnail, although it is only optional and doesn’t require you to fill it in, next is the text. It is a requirement to be filled in to use the material chips Finally, the remove icon can only accept color property and it is also optional.
How to use material design Chips in Flutter Source Codes!
Center(
child: Column(
children: [
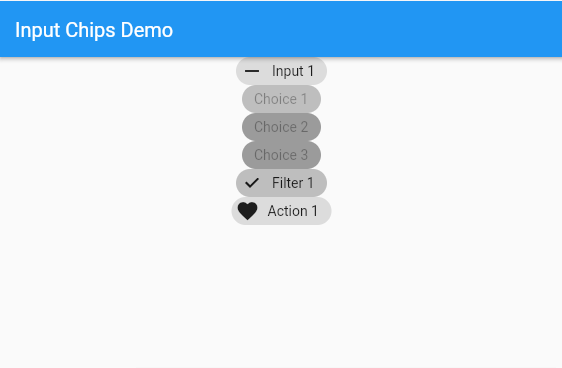
InputChip(
avatar: Icon(Icons.remove),
label: Text('Input 1'),
onSelected: (bool value) {},
),
ChoiceChip(
label: Text('Choice 1'),
selected: true,
),
ChoiceChip(
label: Text('Choice 2'),
selected: false,
),
ChoiceChip(
label: Text('Choice 3'),
selected: false,
),
FilterChip(
label: Text('Filter 1'),
selected: true,
onSelected: (bool value) {},
),
ActionChip(
avatar: Icon(Icons.favorite),
label: Text('Action 1'),
onPressed: () {},
),
],
),
);The source code above gave us an input chip, three choice chips, one filter chip, and lastly, one action chip. You are always welcome to come back here and use this as a reference. I hope it will encourage you to start using Material Chips and you already know how to use material design Chips in Flutter.
Result
Oh by the way, did I forget to tell you that you can also theme your chips? The documentation can be found at: https://material.io/components/chips/flutter#theming
Conclusion
In conclusion, this is how to use material chips in Flutter. The folks at Google gave us 4 types of chips, which are input, choice, filter, and action. We’ve mostly seen it used everywhere. Thank you for your time. Please share this post with your friends if you find it useful. Goodbye.