
If you’ve never created a project where you need to stream videos from the internet, fret not. This blog post is for you because today I am going to show you how to stream videos in Flutter where you can play or pause videos from the internet. Let’s get started!
Accordingly, Video playback is a frequent chore in app development, and Flutter apps are no different. The video player plugin is provided by the Flutter team for playing videos. The video player plugin can be used to play videos stored on the file system, as an asset, or from the internet.
Additionally, The video player plugin on iOS makes use of AVPlayer to handle playback. ExoPlayer is used on Android.
Dependency & Permissions
Thus, to stream videos in Flutter, we need the video_player plugin, to which we should add the given dependency below in our pubspec.yaml file, or we could execute the given Flutter command.
dependencies:
  flutter:
    sdk: flutter
  video_player:
flutter pub add video_playerNow, we need to modify our AndroidManifest.xml file to accept permission to stream videos on the internet.
<manifest xmlns:android="http://schemas.android.com/apk/res/android">
    <application ...>
    </application>

    <uses-permission android:name="android.permission.INTERNET"/>
</manifest>
Setting Up The Controller To Stream Videos In Flutter
Create a VideoPlayerController now that you have the video player plugin installed with the proper permissions. The VideoPlayerController class allows you to connect to and control many types of videos.
You must also initialize the controller before you can play movies. This connects the controller to the video and prepares it for playback.
To create and initialize the VideoPlayerController, first you must create a StatefulWidget with a companion State class, then add a variable to the State class to store the VideoPlayerController, and then add a variable to the State class to store the Future returned from the VideoPlayerController.initialize method, after that you must create and initialize the controller in the initState method. Finally, the dispose method, in the controller.
class VideoPlayerScreen extends StatefulWidget {
const VideoPlayerScreen({super.key});
@override
State<VideoPlayerScreen> createState() => _VideoPlayerScreenState();
}
class _VideoPlayerScreenState extends State<VideoPlayerScreen> {
late VideoPlayerController _controller;
late Future<void> _initializeVideoPlayerFuture;
@override
void initState() {
super.initState();
_controller = VideoPlayerController.network(
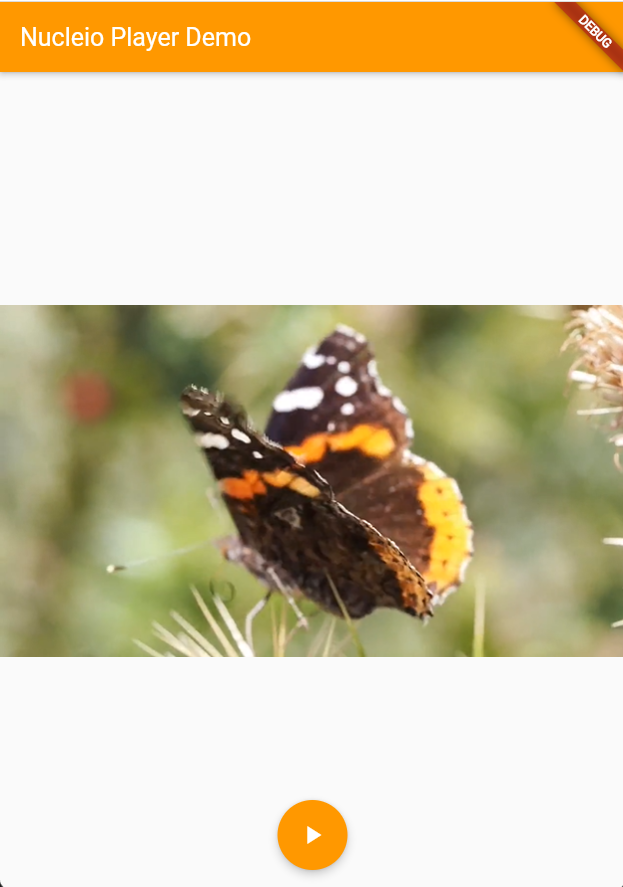
'https://flutter.github.io/assets-for-api-docs/assets/videos/butterfly.mp4',
);
_initializeVideoPlayerFuture = _controller.initialize();
}
@override
void dispose() {
_controller.dispose();
super.dispose();
}
@override
Widget build(BuildContext context) {
return Container();
}
}Display The Video Player To Stream Videos In Flutter
Finally, Display the video now. The video player plugin includes the VideoPlayer widget, which displays the video that the VideoPlayerController has started. The VideoPlayer widget takes up as much area as feasible by default. This isn’t always optimal for videos because they’re designed to be seen in a specific aspect ratio, such as 16×9 or 4×3.
Wrap the VideoPlayer widget in an AspectRatio widget to ensure that the video is proportionate.
Furthermore, after the _initializeVideoPlayerFuture() function has completed, the VideoPlayer widget must be displayed. Display a loading spinner in FutureBuilder until the controller has finished initializing. It should be noted that initializing the controller does not initiate playback.
FutureBuilder(
  future: _initializeVideoPlayerFuture,
  builder: (context, snapshot) {
    if (snapshot.connectionState == ConnectionState.done) {
      return AspectRatio(
        aspectRatio: _controller.value.aspectRatio,
        child: VideoPlayer(_controller),
      );
    } else {
      return const Center(
        child: CircularProgressIndicator(),
      );
    }
  },
)
Creating Play & Pause Buttons
Critically, the video begins in a paused state by default. To begin playback, use the VideoPlayerController‘s play() function. Call the pause() function to pause playback.
Thus, add a FloatingActionButton to your app that shows a play or pause icon depending on the situation for this example. When the user hits the button, either play or pause the video if it is currently paused.
floatingActionButtonLocation: FloatingActionButtonLocation.centerFloat,
      floatingActionButton: FloatingActionButton(
        onPressed: () {
          setState(() {
            if (_controller.value.isPlaying) {
              _controller.pause();
            } else {
              _controller.play();
            }
          });
        },
        child: Icon(
          _controller.value.isPlaying ? Icons.pause : Icons.play_arrow, color: Colors.white,
        ),
      ),
Conclusion & Result
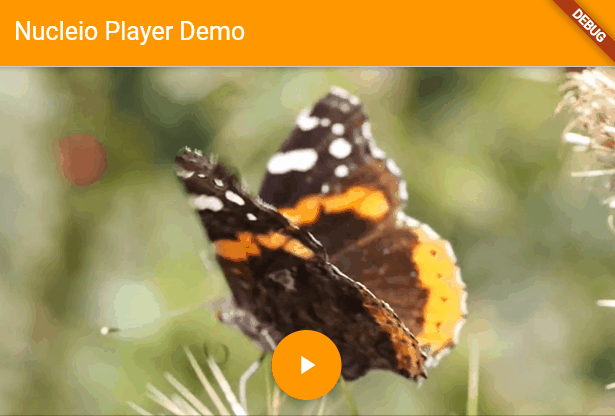
To conclude, we learned that video playback is a common task in app development and Flutter apps are no exception. The Flutter team provides a video player plugin for playing videos. To stream videos in Flutter, we require the video player plugin, to which we must add the given requirements. In this blog, we add a FloatingActionButton to our app that displays a play or pause indicator depending on the situation. When the controller is initialized, it does not start playback but instead displays a loading spinner until the controller is finished initializing. That is, to ensure that the video is proportionate, wrap the VideoPlayer widget in an AspectRatio widget. You may check the full code below or check the official documentation. If you find it useful, please share it. Thank you.
import 'package:flutter/material.dart';
import 'package:video_player/video_player.dart';

void main() {
  runApp(const MyApp());
}

class MyApp extends StatelessWidget {
  const MyApp({super.key});

  @override
  Widget build(BuildContext context) {
    return MaterialApp(
      title: 'Nucleio Player',
      theme: ThemeData(
        primarySwatch: Colors.orange,
      ),
      home: HomeScreen(title: 'Nucleio Player Demo'),
    );
  }
}

class HomeScreen extends StatefulWidget {
  String title;
  HomeScreen({super.key, required this.title});

  @override
  State<HomeScreen> createState() => _HomeScreenState();
}

class _HomeScreenState extends State<HomeScreen> {
  late VideoPlayerController _controller;
  late Future<void> _initializeVideoPlayerFuture;

  @override
  void initState() {
    super.initState();
    _controller = VideoPlayerController.network(
      'https://flutter.github.io/assets-for-api-docs/assets/videos/butterfly.mp4',
    );

    _initializeVideoPlayerFuture = _controller.initialize();
  }

  @override
  void dispose() {
    _controller.dispose();

    super.dispose();
  }

  @override
  Widget build(BuildContext context) {
    return Scaffold(
      appBar: AppBar(
        title: Text(widget.title, style: TextStyle(color: Colors.white),),
      ),
      body: Center(
        child: FutureBuilder(
          future: _initializeVideoPlayerFuture,
          builder: (context, snapshot) {
            if (snapshot.connectionState == ConnectionState.done) {
              return AspectRatio(
                aspectRatio: _controller.value.aspectRatio,
                child: VideoPlayer(_controller),
              );
            } else {
              return const Center(
                child: CircularProgressIndicator(),
              );
            }
          },
        ),
      ),
      floatingActionButtonLocation: FloatingActionButtonLocation.centerFloat,
      floatingActionButton: FloatingActionButton(
        onPressed: () {
          setState(() {
            if (_controller.value.isPlaying) {
              _controller.pause();
            } else {
              _controller.play();
            }
          });
        },
        child: Icon(
          _controller.value.isPlaying ? Icons.pause : Icons.play_arrow, color: Colors.white,
        ),
      ),
    );
  }
}