

Hello! I’m going to make my first Flutter app and teach you how to resolve beginner issues I also face in Visual Studio Code. I’m going to cover a lot of stuff from running our first Flutter app in VSCode to finishing our first app. This is gonna be a long blog so buckle up and let’s get started!
Setting Up the workspace
First, we need to make sure our Flutter environment is setup correctly in our computer by going to CMD (Command Prompt) and typing this command:
flutter doctor
Make sure all the nessesary pre-requisites are installed.
Now find your desirable directory for your Flutter Workspace, In my case Documents > Flutter Workspace then open the terminal there by right-clicking the folder area then “Open terminal” (In Windows 11). Let’s create the Flutter app by typing in the command line:
flutter create my_flutter_app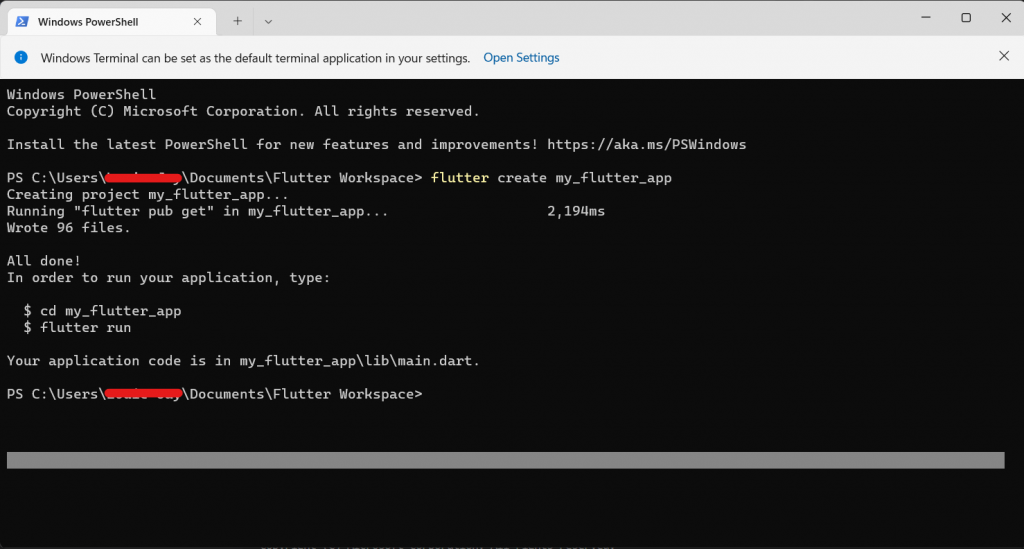
If your terminal result shows just like mine in the image above it means there would be no problem in your Flutter setup.
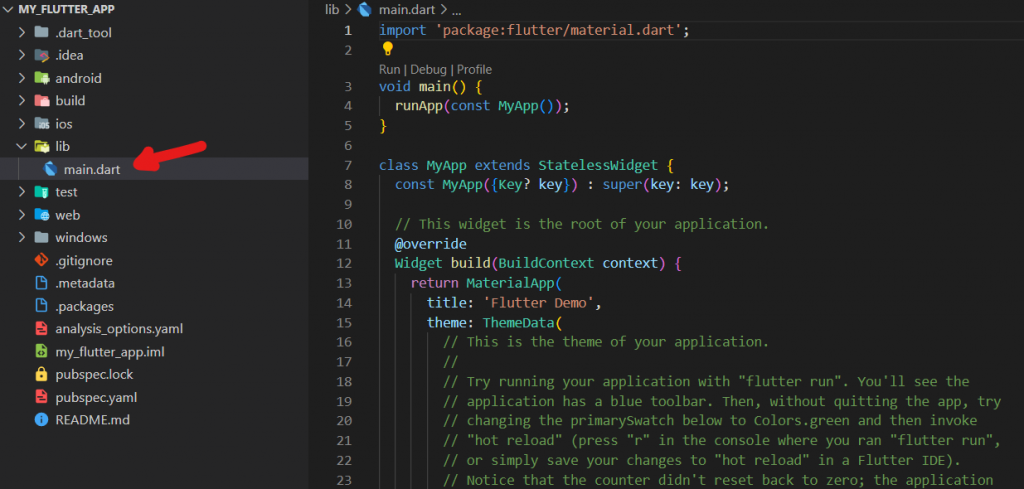
Now, Let’s access our first Flutter project directory by typing in the terminal:
cd my_flutter_appThen let’s open it in Visual Studio Code by typing:
code .And voilà! Our project is opened in VSCode. Now let’s open our main.dart in:
lib > main.dart
Running flutter in browser
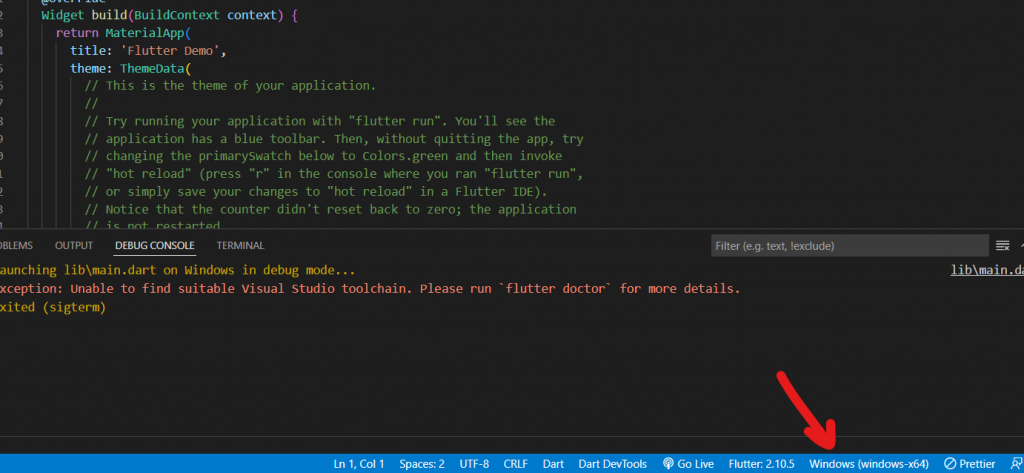
Now if we try to run it by pressing Ctrl + F5 you’ll encounter an error like this:

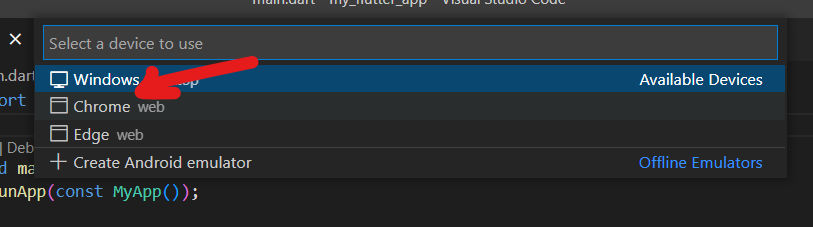
As a beginner this is one of my dumbest mistakes. If you also encounter this, make sure to select the device to use to run our Flutter app is set to Chrome (rather than Windows). Click the Windows in the bottom right and select “Chrome”.
The mindset in Flutter
Now that all the setting up is finished, I just want to share a mindset in creating a Flutter app that helped me understand it, think of Flutter app consist of Widgets and Arguments. So think in your mind “Widget, Argument, Widget, Argument… and so on” pattern.
Coding in Flutter
Now let’s get into the fun part! (coding).
Let’s remove all the code in main.dart file except these:
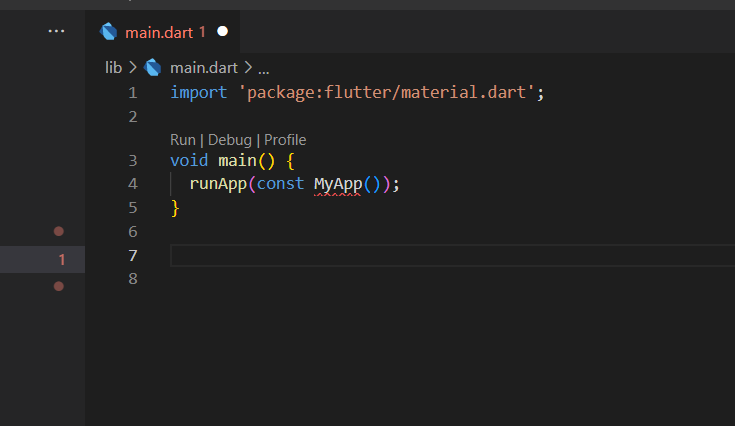
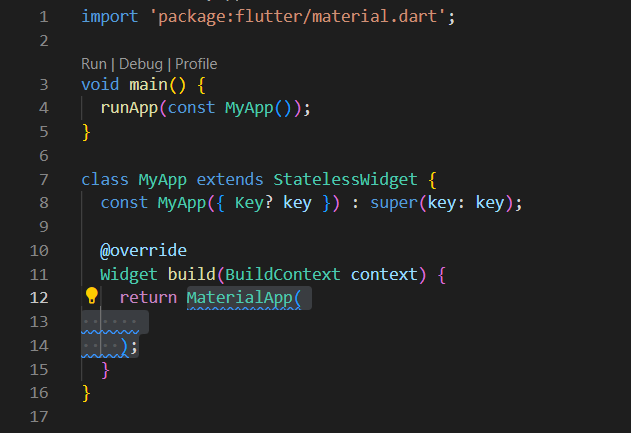
Now below in line 7 let’s create our first StatelessWidget and named it “MyApp”.
class MyApp extends StatelessWidget {
  const MyApp({ Key? key }) : super(key: key);

  @override
  Widget build(BuildContext context) {
    return Container(

    );
  }
}
And change the Container widget into MaterialApp widget.
It would look like this by now:
Scaffold
Now in our MaterialApp widget let’s write in our “home” argument then next our Scaffold widget.
class MyApp extends StatelessWidget {
  const MyApp({ Key? key }) : super(key: key);

  @override
  Widget build(BuildContext context) {
    return MaterialApp(
      home: Scaffold(),
    );
  }
}
Note: Scaffold is the backbone of our app ui.
AppBar
Then, just like any other app, we need to add our AppBar by writing the argument “appBar” inside our Scaffold widget then write our AppBar widget next to the “appBar” argument. Just like this:
class MyApp extends StatelessWidget {
  const MyApp({Key? key}) : super(key: key);

  @override
  Widget build(BuildContext context) {
    return MaterialApp(
      home: Scaffold(
        appBar: AppBar(),
      ),
    );
  }
}
Then inside our AppBar widget write an argument “title” then write a Text widget. By the time you wrote it, it’ll show a blue squiggly line below it. It simply means we need to set the Text widget to constant, it means it doesn’t change so write “const” before the Text widget just like this:
class MyApp extends StatelessWidget {
  const MyApp({Key? key}) : super(key: key);

  @override
  Widget build(BuildContext context) {
    return MaterialApp(
      home: Scaffold(
        appBar: AppBar(
          title: const Text("My First App"),
        ),
      ),
    );
  }
}
Note: Do the same if you encounter a blue squiggly line in your code. I will do it in the rest of this blog.
Now let’s also add color in our AppBar by adding another argument “backgroundColor” then write a Color widget with opacity value starting with 0xFF + OurHexColorCode. In my case I wrote this:
class MyApp extends StatelessWidget {
  const MyApp({Key? key}) : super(key: key);

  @override
  Widget build(BuildContext context) {
    return MaterialApp(
      home: Scaffold(
        appBar: AppBar(
          title: const Text("My First App"),
          backgroundColor: const Color(0xFFfb8b04),
        ),
      ),
    );
  }
}
Body and image asset
Nicely done so far but we’re just half way across. Let’s build the body!
Now back into our code, add another argument called “body” in our Scaffold and then let’s add an image in the body by writing an Image.asset widget in the argument.
class MyApp extends StatelessWidget {
  const MyApp({Key? key}) : super(key: key);

  @override
  Widget build(BuildContext context) {
    return MaterialApp(
      home: Scaffold(
        appBar: AppBar(
          title: const Text("My First App"),
          backgroundColor: const Color(0xFFfb8b04),
        ),
        body: Image.asset(filename),
      ),
    );
  }
}
Now we need an image file to pass into our Image.asset but it’s not as easy as writing the directory in it.
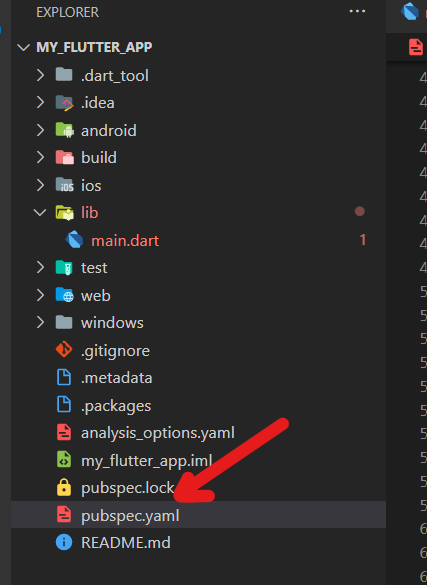
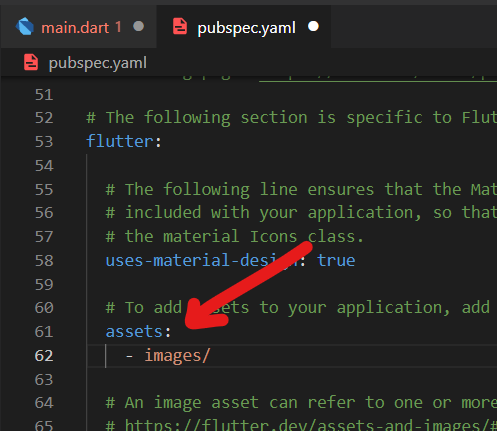
We have to let Flutter know we have an asset so let’s open and modify our pubspec.yaml in the root directory of our project.
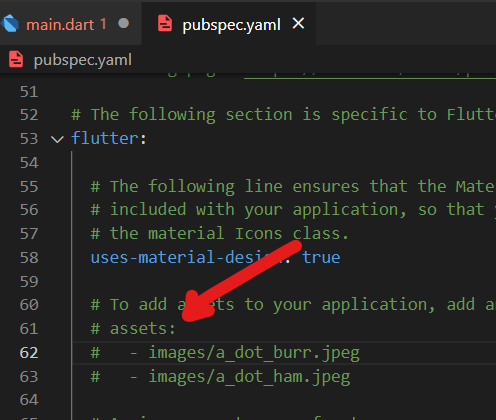
Find the assets comment and uncomment it and leave it with the - images/ line only then save.
See the images below:
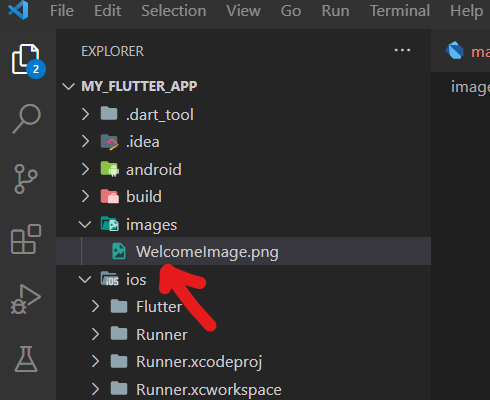
Now let’s create that images folder in our root project directory and put our image file in it.
In my case, I drag and drop my WelcomeImage.png file in the folder.
Then back to our main.dart file. Let’s write our image directory and file in the Image.asset.
class MyApp extends StatelessWidget {
  const MyApp({Key? key}) : super(key: key);

  @override
  Widget build(BuildContext context) {
    return MaterialApp(
      home: Scaffold(
        appBar: AppBar(
          title: const Text("My First App"),
          backgroundColor: const Color(0xFFfb8b04),
        ),
        body: Image.asset("images/WelcomeImage.png"),
      ),
    );
  }
}
Nicely done! but… If we try to run it it’ll show our image placed in the top left of the body. In able to center our image in the body we need to wrapped it with Center widget.
Refactor Trick
If there’s only a convenient way to wrap our widgets…
Fret not! In our code, highlight the Image.asset widget then press Ctrl + Shift + R then click “Wrap with Center”.
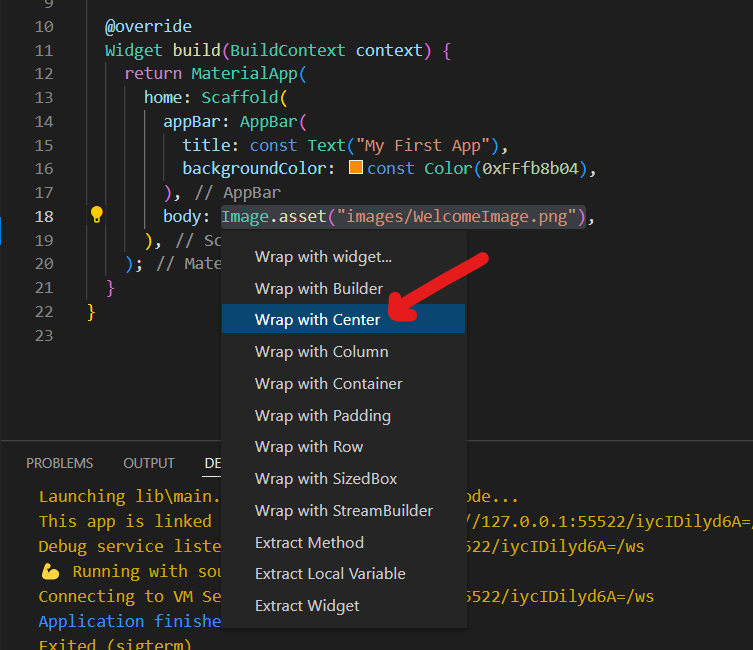
As a beginner you have to know this VSCode trick to conveniently wrap our code with widgets!
class MyApp extends StatelessWidget {
const MyApp({Key? key}) : super(key: key);
@override
Widget build(BuildContext context) {
return MaterialApp(
home: Scaffold(
appBar: AppBar(
title: const Text("My First App"),
backgroundColor: const Color(0xFFfb8b04),
),
body: Center(
child: Image.asset("images/WelcomeImage.png"),
),
),
);
}
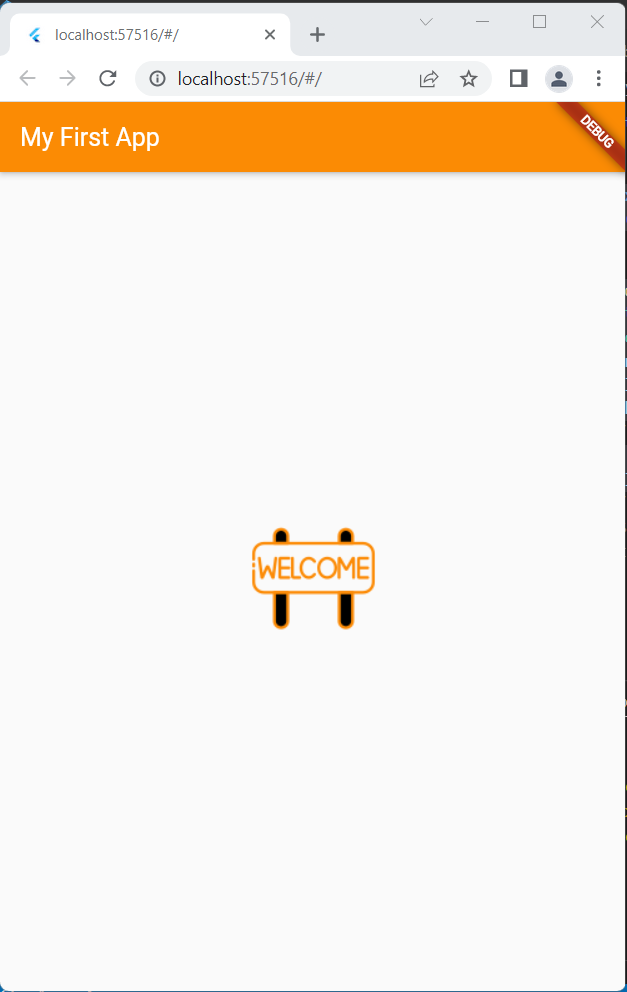
}Now our Image is placed in the center.
BottomNavigationBar and Icons
Let’s add a NavigationBar widget at the bottom of our app!
Now, Let’s add another argument in our Scaffold widget called “bottomNavigationBar” then add a widget called BottomNavigationBar in it. It would look like this:
class MyApp extends StatelessWidget {
  const MyApp({Key? key}) : super(key: key);

  @override
  Widget build(BuildContext context) {
    return MaterialApp(
      home: Scaffold(
        appBar: AppBar(
          title: const Text("My First App"),
          backgroundColor: const Color(0xFFfb8b04),
        ),
        body: Center(
          child: Image.asset("images/WelcomeImage.png"),
        ),
        bottomNavigationBar: BottomNavigationBar(),
      ),
    );
  }
}
Then, the BottomNavigationBar widget will ask an array of BottomNavigationBarItem but before that we need to write an argument called “items” then we shall add our BottomNavigationBarItem in it.
class MyApp extends StatelessWidget {
  const MyApp({Key? key}) : super(key: key);

  @override
  Widget build(BuildContext context) {
    return MaterialApp(
      home: Scaffold(
        appBar: AppBar(
          title: const Text("My First App"),
          backgroundColor: const Color(0xFFfb8b04),
        ),
        body: Center(
          child: Image.asset("images/WelcomeImage.png"),
        ),
        bottomNavigationBar: BottomNavigationBar( items: const [BottomNavigationBarItem()]),
      ),
    );
  }
}
In the BottomNavigationBarItem widget let’s add an argument inside it called “label” and write a string name for your first item. After that write another argument called “icon” and Icon widget passing a IconData (Icons.icon_name) in it. In my case I’ll name it “Home” in the label and set an Icon with an IconData Icons.home.
For clarity check the image and code below:
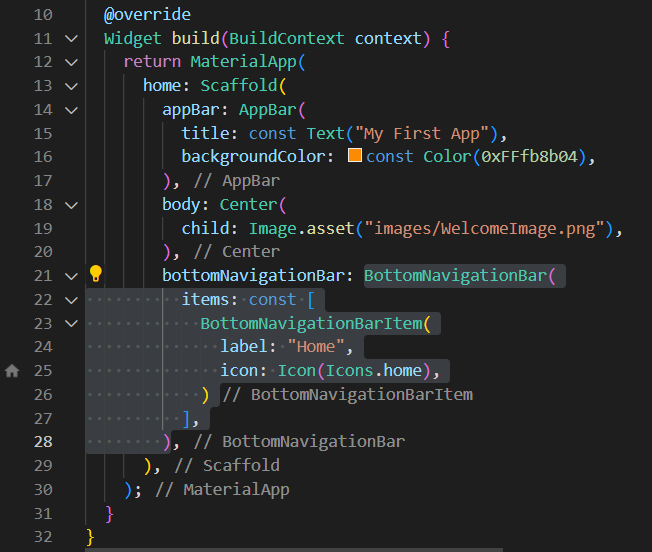
class MyApp extends StatelessWidget {
  const MyApp({Key? key}) : super(key: key);

  @override
  Widget build(BuildContext context) {
    return MaterialApp(
      home: Scaffold(
        appBar: AppBar(
          title: const Text("My First App"),
          backgroundColor: const Color(0xFFfb8b04),
        ),
        body: Center(
          child: Image.asset("images/WelcomeImage.png"),
        ),
        bottomNavigationBar: BottomNavigationBar(
          items: const [
            BottomNavigationBarItem(
              label: "Home",
              icon: Icon(Icons.home),
            )
          ],
        ),
      ),
    );
  }
}
Great! …But a problem will occur:
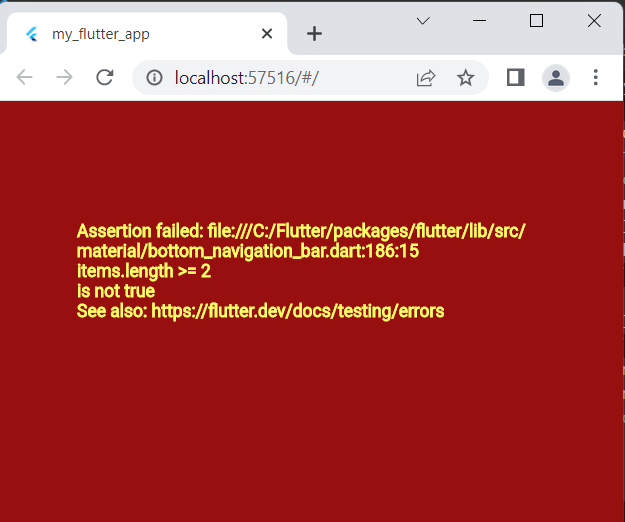
The error means we need to put at least 2 or more BottomNavigationBarItem widget. To solve this in my case, I’ll just add another BottomNavigationBarItem with an argument values of “Settings” and IconData Icons.settings
class MyApp extends StatelessWidget {
  const MyApp({Key? key}) : super(key: key);

  @override
  Widget build(BuildContext context) {
    return MaterialApp(
      home: Scaffold(
        appBar: AppBar(
          title: const Text("My First App"),
          backgroundColor: const Color(0xFFfb8b04),
        ),
        body: Center(
          child: Image.asset("images/WelcomeImage.png"),
        ),
        bottomNavigationBar: BottomNavigationBar(
          items: const [
            BottomNavigationBarItem(
              label: "Home",
              icon: Icon(Icons.home),
            ),
            BottomNavigationBarItem(
              label: "Settings",
              icon: Icon(Icons.settings),
            )
          ],
        ),
      ),
    );
  }
}
Now try to run the app, we’re almost finish but there’s something in our AppBar that doesn’t look good… The debug banner.
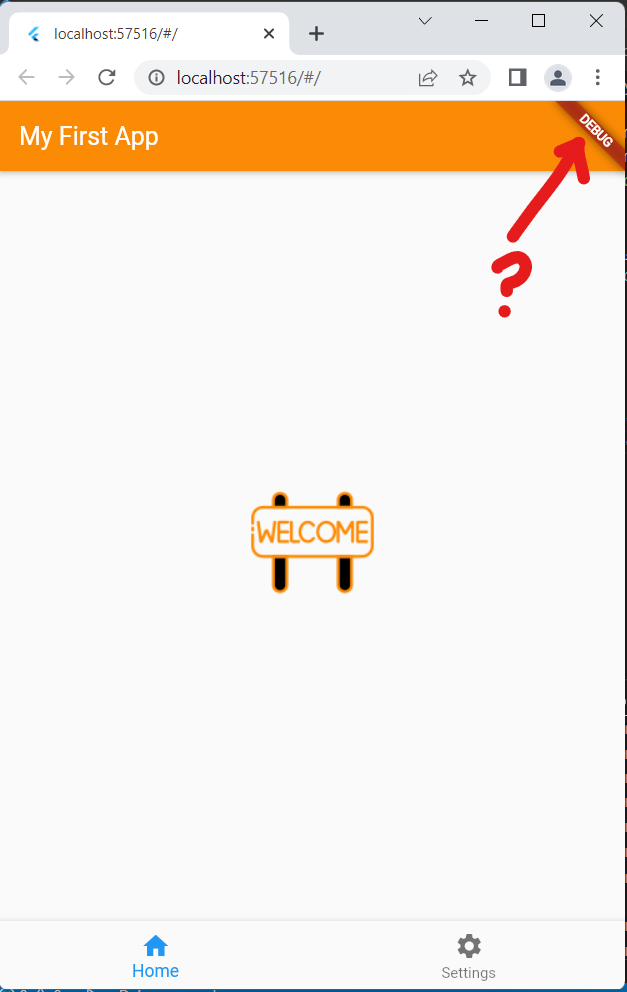
Removing the debug banner
To remove the debug banner in our AppBar we simply just have to add the debugShowCheckedModeBanner argument set to false inside the MaterialApp widget along with the home argument.
debugShowCheckedModeBanner: false,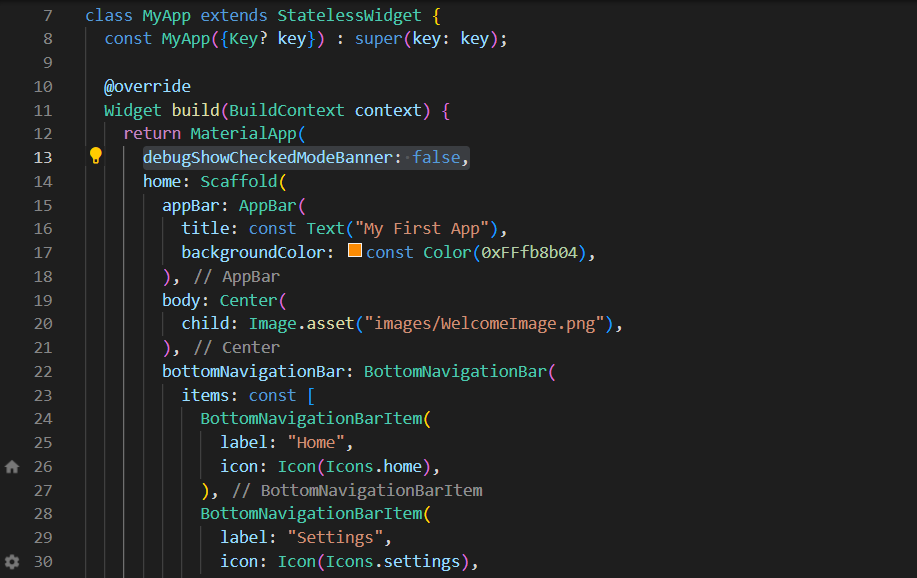
And we’re done!
Congrats to those who made it this far I don’t have a certificate of completion to give you but at least give yourself a pat in the back for making your first Flutter app. You deserve it!
Get copyright free Icons for your apps here: https://icons8.com/
Conclusion
We’ve covered a lot in today’s blog, I shared a lot of solutions to the problems a beginner’s might encounter just like me in writing a Flutter app in VSCode. I’ve also shared a powerful mindset pattern on how to think in Flutter and VSCode tricks that helps beginners to start writing apps in Flutter. I also covered a lot widgets including StatelessWidget, MaterialApp, Scaffold, AppBar, Text, Color, Center, Image.asset, BottomNavigationBar and BottomNavigationItem and lastly removing the debug banner in our app.
Thank you for your time reading.
Continue to follow me in my Flutter journey!