

Unexpected HTTP errors can occur when building and maintaining a website. Such problems are difficult to avoid and some are difficult to solve.
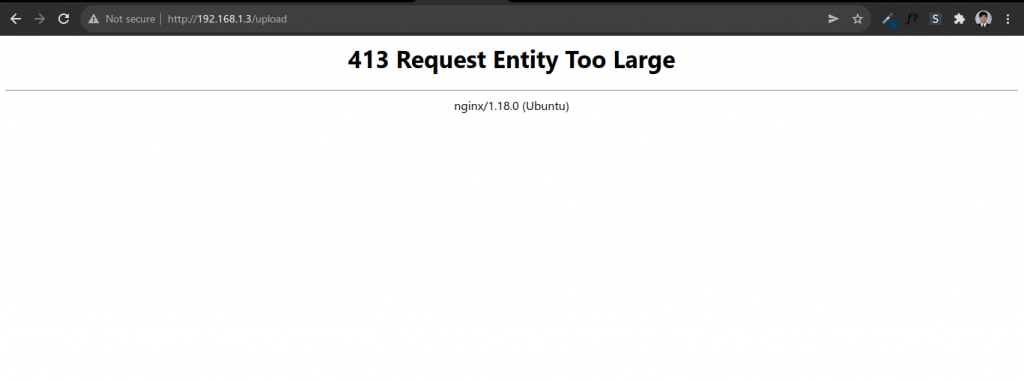
This 413 HTTP error code occurs when the client’s request exceeds the limit of the file size set on the server. If you encounter such an error in your website, this problem is easy to fix and simple to address. All you need to do is to edit some configuration on your server and your problem will be fixed.
Uploads are limited in size on web servers to prevent users from overloading the system and exceeding storage limitations. This limit is rarely a problem, and most website files should stay well below it. Large file uploads, in particular, may occasionally surpass the limit, resulting in a warning like this:
wordPress
If you use WordPress and encounter this kind of error, you need to add a configuration in php.ini file. There are many ways to fix the size limit on your WordPress.
Modify PHP.ini
Modify the php.ini file in your cPanel. In your cPanel menu, select MultiPHP INI Editor under Software.
- In your cPanel menu, select MultiPHP INI Editor under Software.
- In the window that appears, choose your domain from the dropdown menu.
- Change the values of the following parameters to your preference:
- max_execution_time (maximum time to upload, in seconds)
- upload_max_filesize (maximum upload size, in megabytes)
- post_max_size (maximum post size, in megabytes)
- When finished, click Apply.
Modify functions.php
You can also try increasing your size limit via the functions.php file of your current WordPress theme.
- In your cPanel menu, select File Manager under Files.
- Navigate to the folder of your current theme inside your root WordPress directory (public_html by default). Open this theme file.
- Select functions.php and click the Edit icon.
- Copy the code below and paste it at the end of the file
@ini_set( ‘upload_max_size’ , ’64M’ );
@ini_set( ‘post_max_size’, ’64M’);
@ini_set( ‘max_execution_time’, ‘300’ );
- Click Save
Modify environment instance in docker-compose.yml
If you use WordPress on your local machine and deploy it on Docker, you need to add UPLOAD_LIMIT in the environment.
https://stackoverflow.com/questions/58868237/docker-phpmyadmin-has-an-upload-limit-of-2048kib

Nginx server
This is because your Nginx server will not allow you to upload a file that is greater than the size specified in the Nginx config file. To fix this, you must change your Nginx configuration. Fixing this is very simple, just follow this step:
Open your terminal and enter this commands
Go to /etc/nginx/sites-available. This should be the location of your Nginx configuration
cd /etc/nginx/sites-available
Open your config file.
sudo nano <config_file_name>
Add the configuration inside the location
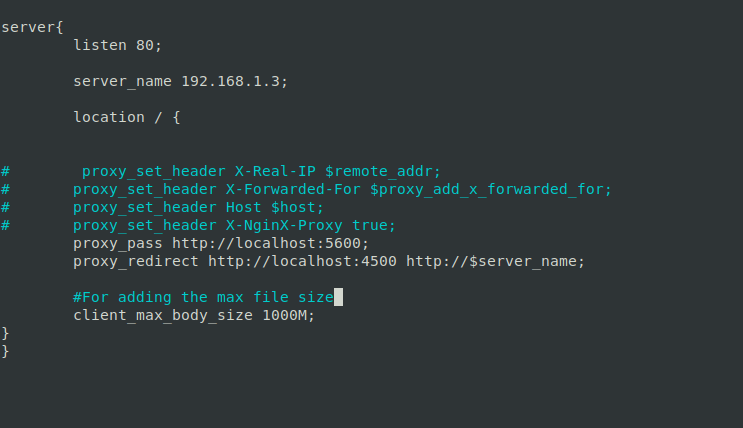
Press ctrl + s to save and ctrl + x to exit
The last step is to restart your Nginx server
sudo service nginx restartsudo systemctl restart nginx
Note: Both commands work the same. Just choose either one to restart your server.
Reference
https://developer.mozilla.org/en-US/docs/Web/HTTP/Status
https://medium.com/@svsh227/error-413-request-entity-too-large-in-nginx-with-client-max-body-size-changes-in-nginx-6aacd525fe11
https://blog.hubspot.com/website/413-request-entity-too-large