
What is Linear Layout?
Linear Layout is a layout in Android that can contain views or elements inside it. It aligns all the children with a single direction, horizontal or vertical. Linear layout, stacks children one after another. For example, a bookshelf has books stacked horizontally or vertically. It is good to use linear layout if you want to have uniform margins or sizes.
How To Use Linear Layout In Android Studio?
When you are using linear layout, you should always define which orientation you want to use. After defining the orientation, you can now put children inside the linear layout.
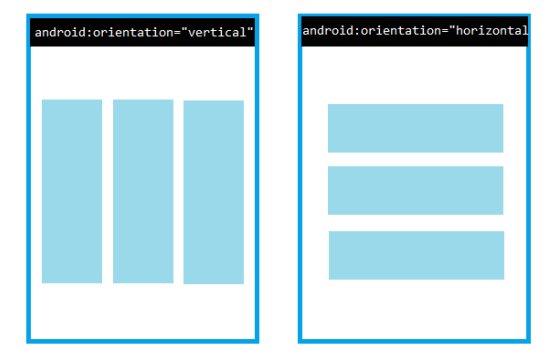
As you can see on the image above, there are two linear layouts with different orientations. The left side has vertical orientation and the right side has horizontal orientation. Now, I will show you how to code it.
<LinearLayout xmlns:android="http://schemas.android.com/apk/res/android"
    android:layout_width="match_parent"
    android:layout_height="match_parent"
    android:paddingLeft="16dp"
    android:paddingRight="16dp"
    android:orientation="vertical" >
    <EditText
        android:layout_width="match_parent"
        android:layout_height="wrap_content"
        android:hint="This is" />
    <EditText
        android:layout_width="match_parent"
        android:layout_height="wrap_content"
        android:hint="an example" />
    <EditText
        android:layout_width="match_parent"
        android:layout_height="0dp"
        android:layout_weight="1"
        android:gravity="top"
        android:hint="of linear layout" />
</LinearLayout>
On line 6, you can see that there is an attribute android:orientation="vertical". This is how you can define the orientation of linear layout. The sample output of this will be the left side on the image above. To learn more about linear layout go to this documentation.
I hope it helped, thank you!