
Looking to migrate your WordPress site to a new host or simply want to create a backup? The All-in-One WP Migration plugin simplifies the process, allowing you to export and import your entire WordPress site effortlessly. The All-in-One WP Migration plugin is a powerful tool that streamlines the migration process for WordPress websites. With this plugin, you can export your entire site, including the database, media files, themes, plugins, and configurations, into a single file. You can then import this file into another WordPress installation, making it easy to transfer your site between hosts or create backups for safekeeping. In this step-by-step guide, I’ll walk you through the process of exporting and importing WordPress projects using the All-in-One WP Migration plugin version 6.77.
1: Installing the Plugin
The latest version of the All-in-One WP Migration plugin only has a 40 MB max size limit for a file. However, the past versions, specifically version 6.77 allowed the plugin backend to be edited which means it could be set on a higher max file limit. The issue here is that the WordPress repository does not store the past versions of the plugin. Hence, I sourced out the version I needed and downloaded it from here.
- After downloading the 6.77 version, navigate to Plugins > Add New Plugin.

- Click Upload Plugin then Choose file and upload the zip file.

- After that, click Install Now and wait for it to install. Click Replace current with uploaded once it is all installed.

2: Exporting Your WordPress Site
Now that the plugin is installed, it’s time to export your WordPress site. Just like the latest version, all you need to do is:
- In your WordPress admin dashboard, go to All-in-One WP Migration in the sidebar.
- Click on Export.

- Choose your preferred export method. You can export your site to a file, to another server, or to a cloud service.
- Click on the Export To button and follow the prompts to begin the export process.

- Once the export process is complete, click on the Download button to save the exported file to your computer.


3: Importing Your WordPress Site
With the export file in hand, you can now import your WordPress site to another installation. This is where version 6.77 of the plugin becomes handy by being able to edit the max file size of the import.
- Install WordPress on the destination server where you want to import your site. If you haven’t done so already, you can install WordPress manually or through your hosting provider. Install the plugin as well just like how step 1 goes.
- In your WordPress admin dashboard, go to All-in-One WP Migration > Import.

- At first, it will say that the max file limit is 40 MB. To change that, go to Plugin File Editor which can either be located in your Plugins section or your Tools section depending on the WordPress version you have installed. For mine, it is in the Plugins section.

- Go to Select the plugin to edit in the top right corner and select All-in-One WP Migration in the drop down. Make sure to press the Select button and double-check if you’re editing the right plugin by looking at what plugin is active in the top left corner.

- Moving on, on the right side you will see the Plugin Files. Select constants.php and scroll down to the code line 282. There you will see the code that defines the file size value which is also where you can change the max file size. Now, you just need to increase the value 28 to any value you want.


- As for mine, I set it to 30. After that, make sure to press Update File down below to save your changes.

- Next, go to All-in-One WP Migration > Import once again and see the change in file size for yourself. Changing it to 30 gave me a max file size limit of 2 GB, therefore, I can now proceed with importing my file.

- Then, click on “Import From” and select the option to import from a file.
- Upload the exported file that you downloaded earlier.
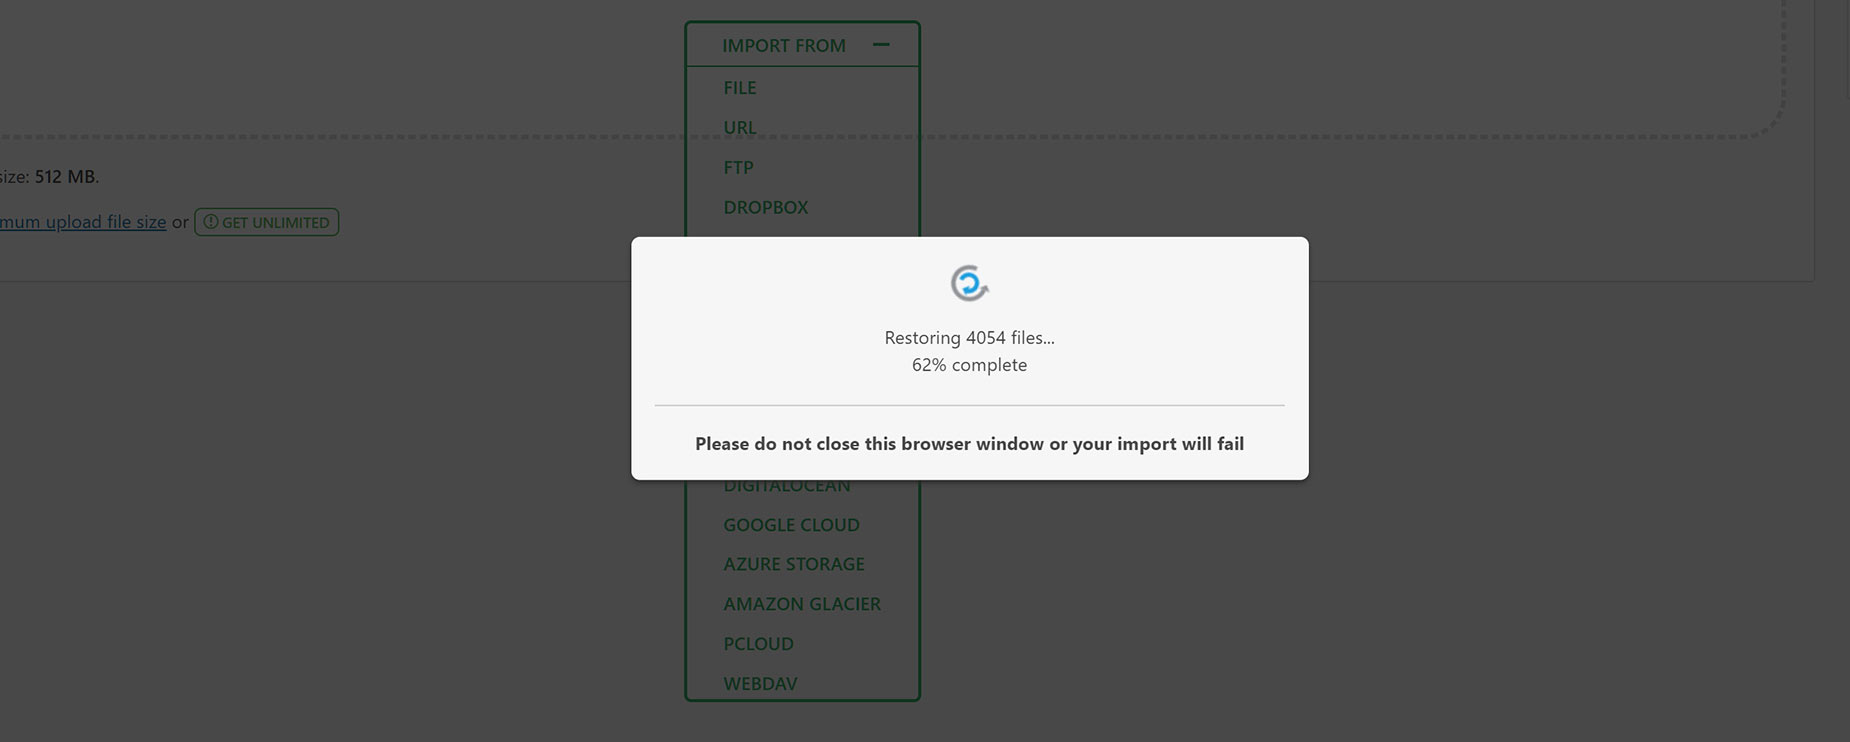
- Once the file is uploaded, the import process will begin automatically. Depending on the size of your site, this may take some time.
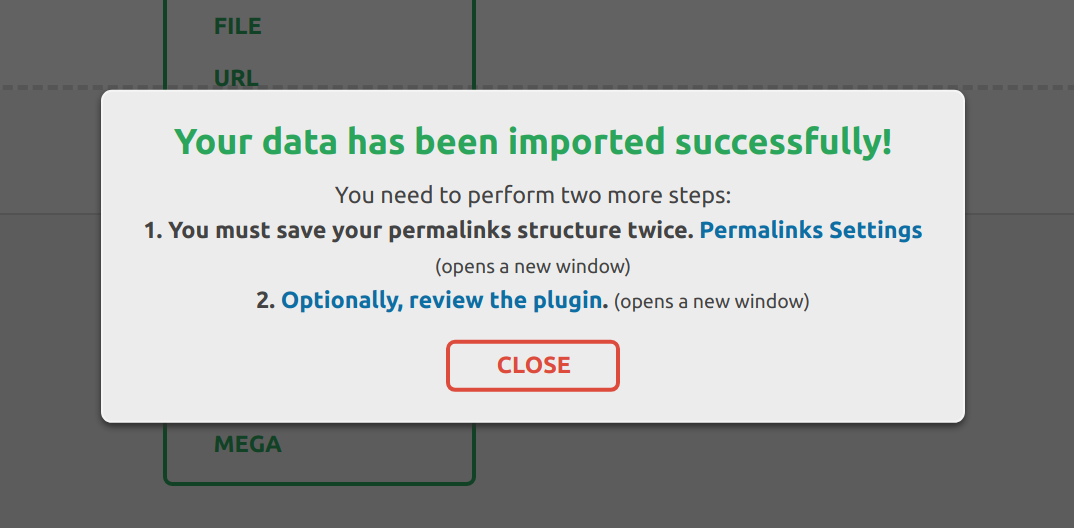
- After the import process is complete, you’ll see a confirmation message indicating that your WordPress site has been successfully imported.
And all done! The All-in-One WP Migration plugin makes it easy to export and import WordPress projects, whether you’re migrating your site to a new host or creating backups for peace of mind. By following this step-by-step guide, you can seamlessly transfer your WordPress site between installations with just a few clicks. Give it a try and experience the convenience of the All-in-One WP Migration plugin for yourself!