
Google Chrome extensions are programs installed in a browser and enhance its functionality. You can build one easily by using web technologies like HTML, CSS, and JavaScript. It is similar to creating a web application, but requires a manifest.json file which will be explained later.
At a very basic level, a Chrome extension is just some HTML, CSS and JavaScript that allows you to add some functionality to Chrome through some of the JavaScript APIs Chrome exposes. It is basically just a web page that is hosted within Chrome and can access some additional APIs.
Step 1: Create the Project
The first thing we need to do is create the project and all the files we need for our extension. Start by creating a new directory that we’ll call “GTmetrix Extension”. With this extension, we’ll be able to use GTmetrix to check every sites that we’ll visit. We’ll put all the files we need for our extension in this new folder. Chrome allows us to load up a plugin by pointing it at a folder that contains the extension files.
All Chrome extensions require a manifest file. This tells Chrome everything it needs to know to properly load up the extension in Chrome. So we’ll create a manifest.json file and put it into the folder we created. You can leave the manifest file blank for now.
Next we’ll need an HTML page to show when a user clicks our Browser Action, so we’ll create a popup.html file and a popup.js file in our “GTmetrix Extension” directory.
Step 2: Create the manifest file
Add some codes to the manifest file to describe the plugin to Chrome. Open up the manifest.json file and enter the following code:
{
  "manifest_version": 2,

  "name": "GTmetrix Analyzer Plugin",
  "description": "This extension will analyze a page using GTmetrix",
  "version": "1.0",

  "browser_action": {
   "default_icon": "icon.png",
   "default_popup": "popup.html"
  },
  "permissions": [
   "activeTab"
   ]
}
Most of the fields in this JSON file are self-explanatory, but take note of the browser_action section where we specify what the default icon is and what HTML page should be displayed when the Browser Action button is clicked.
You’ll also notice that we’ve added a permissions section that specifies that we need to have permission to access the activeTab. This is required in order to enable us to get the URL of the current tab to pass on to GTmetrix.
Many of the APIs Chrome exposes for you to use with your extensions require you to specify any permissions you require.
Step 3: Create the UI
The next step is to create the user interface that the Browser Action will display when it is clicked.

The user interface is going to be very simple and consist of some text that says “GTmetrix Analyzer,” followed by a button that a user can click to perform the analysis on the current page.
Open up the popup.html page and add the following code:
<!doctype html>
<html>
  <head>
    <title>GTmetrix Analyzer</title>
    <script src="popup.js"></script>
  </head>
  <body>
    <h1>GTmetrix Analyzer</h1>
    <button id="checkPage">Check this page now!</button>
  </body>
</html>
You’ll notice that in this HTML, we’ve included the popup.js script. This is where we’ll put the logic for our extension that will execute when the button with the checkPage id is clicked.
Step 4: Implement the logic
The last thing we need to do to create the plugin is to implement the logic that should execute when a user clicks the “Check this page now!” button inside of a tab.
We want to add an event listener to listen for the click event on the checkPage button. When clicked, we need to create a new form to submit to GTmetrix that contains the URL of the current page, submits it, and then displays the result.
Open up the popup.js file and add the following code:
document.addEventListener('DOMContentLoaded', function() {
  var checkPageButton = document.getElementById('checkPage');
  checkPageButton.addEventListener('click', function() {

    chrome.tabs.getSelected(null, function(tab) {
      d = document;

      var f = d.createElement('form');
      f.action = 'http://gtmetrix.com/analyze.html?bm';
      f.method = 'post';
      var i = d.createElement('input');
      i.type = 'hidden';
      i.name = 'url';
      i.value = tab.url;
      f.appendChild(i);
      d.body.appendChild(f);
      f.submit();
    });
  }, false);
}, false);
If you examine the code above, you’ll see that we are first registering a handler for the click event on the checkPage button. Then, when the button is clicked, we get the currently selected tab and execute some JavaScript to create a form with some hidden fields that is submitted to GTmetrix.
We use the URL from the current tab to tell GTmetrix which page to execute the test for.
Testing
Type “chrome://extensions” in a tab to bring up the extensions page.
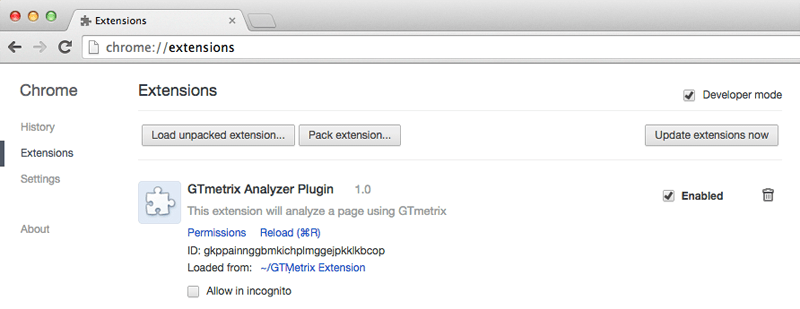
Once on this page, check “Developer mode” to enable loading unpacked extensions. This will allow us to load the extension from a folder. Finally, click “Load unpacked extension” or simply drag the “GTmetrix Extension” folder onto the page to load up the extension. You should immediately see the extension show up as a Browser Action with your icon in the toolbar window of the current tab.
To test out the extension, navigate to a page you want to test with GTmetrics. Then, go ahead and click the icon for our GTmetrix extension. When the HTML page comes up, click “Check this page now!” and you should immediately see the request and results from the current page being displayed.
For full Google Chrome extension documentation, refer to this site: https://developer.chrome.com/docs/extensions/mv3/getstarted/
Sources:
https://www.freecodecamp.org/news/building-chrome-extension/
https://www.sitepoint.com/create-chrome-extension-10-minutes-flat/