
You should build a new branch and work there to avoid any downtime caused by pushing problematic code to the main branch on GitHub. You’ll have to switch to it before you can start working there.
First, you’ll need to know how to create one
Use the git checkout command with the -b flag and a name to establish a new branch in Git.
This will result in the creation of a new branch from the present one. The history of the new branch will begin at the present location of the branch you “branched off from.”
Assuming you’re on the master branch right now:
(master)$ git checkout -b my-feature
Switched to a new branch 'my-feature'
(my-feature)$
Here you can see a new branch created called my-feature which was branched off of master.
Switch to an Existing Branch
You can use git checkout (without the -b flag) to switch to an existing branch by passing the name of the branch you wish to switch to:
(my-feature)$ git checkout master
Switched to branch 'master'
(master)$
By giving -git checkout instead of a branch name, you can quickly return to the previous branch you were working on:
(my-feature)$ git checkout -
Switched to branch 'master'
(master)$ git checkout -
Switched to branch 'my-feature'
(my-feature)$
Switch Branches From the GitHub Website
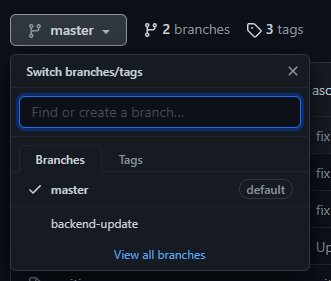
To swap branches from the GitHub website, open your favourite browser, navigate to the official GitHub website, log in to your account, and then select the repository where your branch is located.
You’ll notice a button next to the Branches and Tags options once you’ve entered the repository. A drop-down menu will appear when you click this button. Select the desired branch from the list on the “Branches” page. You’ll be in that branch once you’ve chosen it.
This method is fine if you’re going to make your changes to the branch on the website, but if you’re working on your local machine, you’ll want to use a git command.